Showing posts with label tutorials. Show all posts

Friday, December 28, 2012

Finished Object Friday

I have just a few things to show you today, a few things I finished up for around the house and as holiday gifts:

In total, I made six or eight of these towels, though a few are still waiting for suitable buttons. They all came from the same package, however, so the patterns are mostly the same.

Speaking of which, if you would like a PDF of the crochet tutorial I posted the other day, it is now available on Ravelry, here. The knitting one should be up shortly after the new year.


This took up most of my knitting/crochet time. I don't crochet much any more because it bothers my wrists, but the recipient of this was instrumental in making our new house livable in a reasonable amount of time, and it was hinted that she would appreciate an afghan. I used six balls of Lion Brand Homespun Chunky for it. It came together much faster than I expected (which NEVER happens!), and is just the right size for lounged on the couch or in bed. It's also super soft.
---
If you follow my Twitter, then you know that this year, for the second year running, I made my aunt socks that didn't fit, and she bought me something I'd just gotten for myself, thinking no one would get it for me for Christmas--a subscription to Vogue Knitting. What's more, my mom commented that SHE considered getting me one, too! And here people keep saying I'm hard to shop for....

We've decided that next year, we'll just go shopping together.

Friday, December 21, 2012

Kitchen Towel Tutorial: Knit


Tea Towel: Knit version (makes 2 sets)
 
 Tools and Materials:

  • 1 tea towel or kitchen hand towel (you can also use bath and towels, but I like the patterns on the kitchen ones)
  • 2 balls of dish cotton to coordinate, like Sugar 'n' Cream (I'm using a cone because I make a lot of these)
  • 1 sharp yarn needle (These can be difficult to find. Plastic tapestry needles don't work very well for this; it should be metal with a fairly sharp point and an eye large enough for your yarn)

  • Fabric scissors (the sharper the better)
  • Knitting needles in your preferred size. I normally use a 5 or 7 for this yarn.

**Hint: If you want to stock up on these to have them handy for housewarming, birthday or last-minute holiday gifts, I've found that white, red, blue, and green are the best colors to use, since they're the most common kitchen colors. Also, white can be bleached without an issue.

To begin:

1. We're going to start off exactly as we did with the crochet version. Open up your pack of towels, and cut along that fold at the top so you end up with something like this:
 
2. Fold down your raw edges, just enough so that they can be held in place (about 1/3-1/2 inch). You might need pins or clips to keep the folds intact, but if you're practiced, you can just use your hand, like so: 
 
3.  Draw your needle and yarn through the corner of the towel, as close to the right side as you can and just below the fold. Pull an arms length or so of yarn through, so that you'll have enough to stitch up the entire top of the towel. Do NOT cut your yarn from the ball. This will be important later. (If you're working from a cone or find that you simply MUST cut your  yarn, measure out a good 12-15 yards first).


4. Loosely whip stitch all the way across the top of the towel. Make sure your stitches don't pucker; LOOSE is the key here! The yarn should merely rest at the top of the fold, not clamp down on it.

You'll want an odd number of stitches, evenly spaced (or as close to even as you can manage. No one is perfect). For this example, I used 19 stitches and size US 7 needles.

5. When you reach the end, slide the needle back through the stitches you just made for an inch or two, then cut your yarn. Voila, that's your first end woven in already.

6. With the working yarn on your right, insert one of your knitting needles into the stitches you just made, starting on the far left. Just slide it all the way down. If you discover that your stitches were too tight, then just tug on each loop starting at the right and working towards your needle to add extra yarn. If they were too loose, then once your needle in in place you can give them a tug starting on the left and going to the right to tighten them up.

7. Those whip stitches are your cast on row. So, take your other needle, and start knitting! I like to use seed stitch for these towels, but you can also use linen stitch or whatever floats your boat. I don't recommend stockinette, because of the curling issue, or garter stitch, because it stretches.  You might find it easier if you knit the first row before beginning any pattern stitches.


8. Beginning on row two, knit or purl your last two stitches together to form the decrease in pattern.

9. When you have nine stitches left, stop decreasing.

10. After 3-4 inches (your preference), work the first four stitches in pattern, then yarn over, knit two together, and continue in pattern for the rest of the row.

11. Work one more row in pattern.

12. Decrease as before, at the end of each row.

13. With 3 stitches remaining, cast off and weave in ends.

Sew on a button, and there you have it. Use the remaining yarn in your ball for the washcloth. My go-to pattern is usually stockinette with a band 4 stitches/rows wide of seed stitch around the border, but there are other, fancier patterns you can use.

Friday, December 14, 2012

Kitchen Towel Tutorial: Crochet

It's only been what, two years coming? Three? Well, at long last, I finally present the tutorial for my favorite holiday gift to give: Crochet/knit tea towels and washcloths.

Tea Towel: Crochet version (makes 2 sets)
 
 Tools and Materials:
  • 1 tea towel or kitchen hand towel (you can also use bath and towels, but I like the patterns on the kitchen ones)
  • 2 balls of dish cotton to coordinate, like Sugar 'n' Cream (I'm using a cone because I make a lot of these)
  • 1 sharp yarn needle (These can be difficult to find. Plastic tapestry needles don't work very well for this; it should be metal with a fairly sharp point and an eye large enough for your yarn)
  • Fabric scissors (the sharper the better)

  • 1 crochet hook in your preferred size (For this yarn, I like between an I and K, but choose your hook based on your gauge). 

**Hint: If you want to stock up on these to have them handy for housewarming, birthday or last-minute holiday gifts, I've found that white, red, blue, and green are the best colors to use, since they're the most common kitchen colors. Also, white can be bleached without an issue.

To begin:


 1. Open your package of towels. Notice how they are folded in half? Take your scissors and cut along that line, so that you are left with this:
 
2. Fold down your raw edges, just enough so that they can be held in place (about 1/3-1/2 inch). You might need pins or clips to keep the folds intact, but if you're practiced, you can just use your hand, like so: 
 
3.  Draw your needle and yarn through the corner of the towel, as close to the right side as you can and about 1/4 inch from the top. Pull an arm length or so of yarn through, so that you'll have enough to stitch up the entire top of the towel. Do NOT cut your yarn from the ball. This will be important later. (If you're working from a cone or find that you simply MUST cut your  yarn, measure out a good 12-15 yards first).


 4. We're going to do a blanket stitch along the top. This will keep the towel from coming apart, and give us a base to crochet into to.

Traditional blanket stitch is done from left to right. I always do it from right to left. *shrug* Whatever floats your boat. At any rate, all you have to do is insert the needle into the fabric from the front. When it comes out the other side, make sure the yarn is behind the needle (as shown below). Pull it through, and you should have what looks a bit like a crochet stitch at the top of the fabric.

5. Repeat this all the way across. Depending on your hook size/intended gauge, you'll want between 15-20 stitches total. For this example, I used a K hook and 17 stitches.  When you reach the end of the fabric, simply slide the needle under the stitches you just made for 2-3 inches. Then pull it out, and trim your yarn. Voila, that's one end you don't have to weave in now. It will be hidden as you crochet.
 6. At this point, you should have something like this:
 7. Now take your crochet hook and insert it into the far right hand stitch, picking up the horizontal bar at the top of the fabric. Single crochet all the way across:

 8. Keep going just like this, but from here on out, don't crochet into the last stitch on each row.
9. When you're down to 7 stitches, stop decreasing.
10. Keep working those 7 stitches until you have a strip about 2 inches long.
11. Now, single crochet into the first three stitches. Chain 1, skipping a stitch, and single crochet into the last 3 stitches.
12. In the same manner as before, decrease until only 3 stitches remain. Cut your yarn, finish your work by drawing the cut end through your last loop, and weave in your ends.

13. Sew a button at the base of that thin little strip. Shank buttons work, but I find that the flat kind with holes work better
 14. Use the remainder of the ball to make the matching washcloth. There are lots of patterns available online, but my standard is to chain 23 stitches and work in single crochet until I run out of yarn.
15. You can now machine wash and dry these, just like any other kitchen towels.
16. Hang it from a kitchen cabinet or your oven door, or give it as a gift. 


And there you have it! Next week I'll come back and show you how to make the knit version, which is quite similar.

Sunday, December 12, 2010

Fixing Cables on Previous Rows Tutorial

I've been sick all week. Still sick, in fact, but there's been little to do the past few days except for knit. I got the first repeat and a half done on the left front of the London Calling sweater only to realize that in my fevered state I'd forgotten to twist all of the cables bordering the main pattern. It's an 18 row repeat, and I really wasn't looking forward to starting over. Thankfully though, I am slightly smarter than the average bear, and I know how to fix most errors no matter how many rows I've knit since then. Below is my guide for dropping stitches to fix a cable. I'll warn you, it's kind of fiddly, but a heck of a lot faster than re-knitting the entire thing. I was able to do all of this in about 45 minutes, or however long and episode of Star Trek: TNG is, since that's what I was watching at the time.
To do this, you're going to need:
~ 2 DPNs (I recommend in a slightly smaller size than what you're doing the knitting in. Here I'm using a 2mm sock needle, just because it's what I had handy. The sweater itself is knit on size 8 US needles, so you needn't go quite that small)
~A cable needle (or you can use the same DPN, since my cable needles went on a vacation while I was shooting this)
~A crochet hook, preferably 1-2 sizes smaller than the needles the original garment is worked on, but one of the same size will do
~Some guts and possibly a stiff drink, depending on your constitution
~It is also extremely helpful, but not strictly necessary, to know how to knit back backwards. This is the video I used to learn, but there are a lot more out there now.

This technique works best with a straight-up cable; you'll have to do a lot more work with a traveling cable or anything fancier. Read your pattern carefully to make sure you understand what you need to do.

My pattern called for a cable twist every 4 rows. This means I have a purl row, a knit row, another purl row, and then a cable twist.

I went to the bottom of the pattern work (just above the ribbing) and counted up four rows. On the forth row, I inserted the DPN through the right leg of each stitch, acting like a lifeline.

Now, on a right side row, follow your pattern until you reach the problem area, take a deep breath and drop all of those stitches (4, in my case). Leave rest of the stitches on your needles (if you have point protectors, you might find it handy to cap them to keep stitches from sliding off).

Let the stitches ladder until they hit the DPN. Assist them and do a shot if needed.

(Really, it's not that scary when you get used to it).

*Now, slip two stitches from the DPN onto your cable needle and hold it to the front.
Grab your crochet hook and slide it through the first stitch on the dpn knitwise. Grab the lowest run of the ladder created by the dropped stitches, and pull it through. Slide that stitch off the DPN, and repeat with the second stitch, then move on to the cable needle.
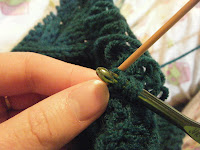
When all four stitches have been knit, make sure that they are facing the right way (not twisted or anything) and slip them back on to the DPN. Now knit with the ladder rungs for another 3 rows, without the cable twists, and repeat from the *.

I found it easier after a while to skip the DPNs and the crochet hook and just use my normal needles, knitting back backwards on purl rows and knitting normally with the ladder rungs on knit rows, but this might not be the case for you (remember, I said this was fiddly). (In the picture, you can see the ladder rung is over my index finger, while the actual working yarn is just hanging out in the upper right. The hardest part is just making sure you're knitting with the right rung).

Here is how the sweater front looked when I was finished:


And this is what it looks like today:


I am unbelievably proud of that pocket. I've been stashing my ball of yarn and my cable needle inside so I don't loose it again. Technically, sewing up the pocket was supposed to wait until the end, but I got too excited. For some reason, pockets and sweaters never connected in my head in the past, and I find the idea of knitting one in most exciting.

I freely admit I'm not very good with this whole teaching thing, so if you have any questions about how I did this, jut leave a comment and I'll do my best to clarify.