I have just a few things to show you today, a few things I finished up for around the house and as holiday gifts:
In total, I made six or eight of these towels, though a few are still waiting for suitable buttons. They all came from the same package, however, so the patterns are mostly the same.
Speaking of which, if you would like a PDF of the crochet tutorial I posted the other day, it is now available on Ravelry, here. The knitting one should be up shortly after the new year.
This took up most of my knitting/crochet time. I don't crochet much any more because it bothers my wrists, but the recipient of this was instrumental in making our new house livable in a reasonable amount of time, and it was hinted that she would appreciate an afghan. I used six balls of Lion Brand Homespun Chunky for it. It came together much faster than I expected (which NEVER happens!), and is just the right size for lounged on the couch or in bed. It's also super soft.
---
If you follow my Twitter, then you know that this year, for the second year running, I made my aunt socks that didn't fit, and she bought me something I'd just gotten for myself, thinking no one would get it for me for Christmas--a subscription to Vogue Knitting. What's more, my mom commented that SHE considered getting me one, too! And here people keep saying I'm hard to shop for....
We've decided that next year, we'll just go shopping together.
This blog is no longer active. Please visit http://www.knotmagickknitter.wordpress.com for my newest posts!
Showing posts with label holiday. Show all posts
Friday, December 28, 2012
Friday, December 21, 2012
Kitchen Towel Tutorial: Knit
Tea Towel: Knit version (makes 2 sets)
Tools and Materials:
- 1 tea towel or kitchen hand towel (you can also use bath and towels, but I like the patterns on the kitchen ones)
- 2 balls of dish cotton to coordinate, like Sugar 'n' Cream (I'm using a cone because I make a lot of these)
- 1 sharp yarn needle (These can be difficult to find. Plastic tapestry needles don't work very well for this; it should be metal with a fairly sharp point and an eye large enough for your yarn)
- Fabric scissors (the sharper the better)
- Knitting needles in your preferred size. I normally use a 5 or 7 for this yarn.
**Hint: If you want to stock up on these to have them handy for housewarming, birthday or last-minute holiday gifts, I've found that white, red, blue, and green are the best colors to use, since they're the most common kitchen colors. Also, white can be bleached without an issue.
To begin:
2. Fold down your raw edges, just enough so that they can be held in place (about 1/3-1/2 inch). You might need pins or clips to keep the folds intact, but if you're practiced, you can just use your hand, like so:
3. Draw your needle and yarn through the corner of the towel, as close to the right side as you can and just below the fold. Pull an arms length or so of yarn through, so that you'll have enough to stitch up the entire top of the towel. Do NOT cut your yarn from the ball. This will be important later. (If you're working from a cone or find that you simply MUST cut your yarn, measure out a good 12-15 yards first).
4. Loosely whip stitch all the way across the top of the towel. Make sure your stitches don't pucker; LOOSE is the key here! The yarn should merely rest at the top of the fold, not clamp down on it.
You'll want an odd number of stitches, evenly spaced (or as close to even as you can manage. No one is perfect). For this example, I used 19 stitches and size US 7 needles.
5. When you reach the end, slide the needle back through the stitches you just made for an inch or two, then cut your yarn. Voila, that's your first end woven in already.
6. With the working yarn on your right, insert one of your knitting needles into the stitches you just made, starting on the far left. Just slide it all the way down. If you discover that your stitches were too tight, then just tug on each loop starting at the right and working towards your needle to add extra yarn. If they were too loose, then once your needle in in place you can give them a tug starting on the left and going to the right to tighten them up.
7. Those whip stitches are your cast on row. So, take your other needle, and start knitting! I like to use seed stitch for these towels, but you can also use linen stitch or whatever floats your boat. I don't recommend stockinette, because of the curling issue, or garter stitch, because it stretches. You might find it easier if you knit the first row before beginning any pattern stitches.
8. Beginning on row two, knit or purl your last two stitches together to form the decrease in pattern.
9. When you have nine stitches left, stop decreasing.
10. After 3-4 inches (your preference), work the first four stitches in pattern, then yarn over, knit two together, and continue in pattern for the rest of the row.
11. Work one more row in pattern.
12. Decrease as before, at the end of each row.
13. With 3 stitches remaining, cast off and weave in ends.
Sew on a button, and there you have it. Use the remaining yarn in your ball for the washcloth. My go-to pattern is usually stockinette with a band 4 stitches/rows wide of seed stitch around the border, but there are other, fancier patterns you can use.
Friday, December 14, 2012
Kitchen Towel Tutorial: Crochet
It's only been what, two years coming? Three? Well, at long last, I finally present the tutorial for my favorite holiday gift to give: Crochet/knit tea towels and washcloths.
Tea Towel: Crochet version (makes 2 sets)

Tools and Materials:
**Hint: If you want to stock up on these to have them handy for housewarming, birthday or last-minute holiday gifts, I've found that white, red, blue, and green are the best colors to use, since they're the most common kitchen colors. Also, white can be bleached without an issue.
To begin:
1. Open your package of towels. Notice how they are folded in half? Take your scissors and cut along that line, so that you are left with this:

2. Fold down your raw edges, just enough so that they can be held in place (about 1/3-1/2 inch). You might need pins or clips to keep the folds intact, but if you're practiced, you can just use your hand, like so:

3. Draw your needle and yarn through the corner of the towel, as close to the right side as you can and about 1/4 inch from the top. Pull an arm length or so of yarn through, so that you'll have enough to stitch up the entire top of the towel. Do NOT cut your yarn from the ball. This will be important later. (If you're working from a cone or find that you simply MUST cut your yarn, measure out a good 12-15 yards first).
4. We're going to do a blanket stitch along the top. This will keep the towel from coming apart, and give us a base to crochet into to.
Traditional blanket stitch is done from left to right. I always do it from right to left. *shrug* Whatever floats your boat. At any rate, all you have to do is insert the needle into the fabric from the front. When it comes out the other side, make sure the yarn is behind the needle (as shown below). Pull it through, and you should have what looks a bit like a crochet stitch at the top of the fabric.

5. Repeat this all the way across. Depending on your hook size/intended gauge, you'll want between 15-20 stitches total. For this example, I used a K hook and 17 stitches. When you reach the end of the fabric, simply slide the needle under the stitches you just made for 2-3 inches. Then pull it out, and trim your yarn. Voila, that's one end you don't have to weave in now. It will be hidden as you crochet.
6. At this point, you should have something like this:
7. Now take your crochet hook and insert it into the far right hand stitch, picking up the horizontal bar at the top of the fabric. Single crochet all the way across:
8. Keep going just like this, but from here on out, don't crochet into the last stitch on each row.
9. When you're down to 7 stitches, stop decreasing.
10. Keep working those 7 stitches until you have a strip about 2 inches long.
11. Now, single crochet into the first three stitches. Chain 1, skipping a stitch, and single crochet into the last 3 stitches.
12. In the same manner as before, decrease until only 3 stitches remain. Cut your yarn, finish your work by drawing the cut end through your last loop, and weave in your ends.
13. Sew a button at the base of that thin little strip. Shank buttons work, but I find that the flat kind with holes work better
14. Use the remainder of the ball to make the matching washcloth. There are lots of patterns available online, but my standard is to chain 23 stitches and work in single crochet until I run out of yarn.
15. You can now machine wash and dry these, just like any other kitchen towels.
16. Hang it from a kitchen cabinet or your oven door, or give it as a gift.
And there you have it! Next week I'll come back and show you how to make the knit version, which is quite similar.
Tea Towel: Crochet version (makes 2 sets)
Tools and Materials:
- 1 tea towel or kitchen hand towel (you can also use bath and towels, but I like the patterns on the kitchen ones)
- 2 balls of dish cotton to coordinate, like Sugar 'n' Cream (I'm using a cone because I make a lot of these)
- 1 sharp yarn needle (These can be difficult to find. Plastic tapestry needles don't work very well for this; it should be metal with a fairly sharp point and an eye large enough for your yarn)
- Fabric scissors (the sharper the better)
- 1 crochet hook in your preferred size (For this yarn, I like between an I and K, but choose your hook based on your gauge).
**Hint: If you want to stock up on these to have them handy for housewarming, birthday or last-minute holiday gifts, I've found that white, red, blue, and green are the best colors to use, since they're the most common kitchen colors. Also, white can be bleached without an issue.
To begin:
1. Open your package of towels. Notice how they are folded in half? Take your scissors and cut along that line, so that you are left with this:
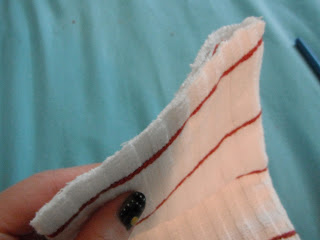
2. Fold down your raw edges, just enough so that they can be held in place (about 1/3-1/2 inch). You might need pins or clips to keep the folds intact, but if you're practiced, you can just use your hand, like so:
3. Draw your needle and yarn through the corner of the towel, as close to the right side as you can and about 1/4 inch from the top. Pull an arm length or so of yarn through, so that you'll have enough to stitch up the entire top of the towel. Do NOT cut your yarn from the ball. This will be important later. (If you're working from a cone or find that you simply MUST cut your yarn, measure out a good 12-15 yards first).
4. We're going to do a blanket stitch along the top. This will keep the towel from coming apart, and give us a base to crochet into to.
Traditional blanket stitch is done from left to right. I always do it from right to left. *shrug* Whatever floats your boat. At any rate, all you have to do is insert the needle into the fabric from the front. When it comes out the other side, make sure the yarn is behind the needle (as shown below). Pull it through, and you should have what looks a bit like a crochet stitch at the top of the fabric.
5. Repeat this all the way across. Depending on your hook size/intended gauge, you'll want between 15-20 stitches total. For this example, I used a K hook and 17 stitches. When you reach the end of the fabric, simply slide the needle under the stitches you just made for 2-3 inches. Then pull it out, and trim your yarn. Voila, that's one end you don't have to weave in now. It will be hidden as you crochet.
6. At this point, you should have something like this:
7. Now take your crochet hook and insert it into the far right hand stitch, picking up the horizontal bar at the top of the fabric. Single crochet all the way across:
8. Keep going just like this, but from here on out, don't crochet into the last stitch on each row.
9. When you're down to 7 stitches, stop decreasing.
10. Keep working those 7 stitches until you have a strip about 2 inches long.
11. Now, single crochet into the first three stitches. Chain 1, skipping a stitch, and single crochet into the last 3 stitches.
12. In the same manner as before, decrease until only 3 stitches remain. Cut your yarn, finish your work by drawing the cut end through your last loop, and weave in your ends.
13. Sew a button at the base of that thin little strip. Shank buttons work, but I find that the flat kind with holes work better
14. Use the remainder of the ball to make the matching washcloth. There are lots of patterns available online, but my standard is to chain 23 stitches and work in single crochet until I run out of yarn.
15. You can now machine wash and dry these, just like any other kitchen towels.
16. Hang it from a kitchen cabinet or your oven door, or give it as a gift.
And there you have it! Next week I'll come back and show you how to make the knit version, which is quite similar.
Saturday, November 3, 2012
Giftmas Knitting Part I: Planning
Good gravy, I've been off the ball, haven't I? NaNoWriMo (or really, to be honest, the NaNo forums) kind of ate my soul this week. It's a problem, since most the time I can set aside to write happens to be time that is normally taken up with knitting. It's leaving me in a quandary, since I have at least two projects that need to be done by the end of November, and I can't work on them if I'm writing. The only solution, obviously, to st get an extra set of arms, like this:
One set could be writing, another cleaning, then one for my Christmas knitting and another to work on my next pattern, which I thought for sure would be done by now. I did not count on ripping it back every time I sit down to work on it.
In the mean time, however, I'll just have to come up with another solution. And for this, that means lists and a whole lot of prioritizing and planing
Last year in my family, we started doing this differently. Instead of everyone buying gifts for everyone, we drew names out of a hat and we each buy for that person. We did this because we're all pretty broke, for various reasons.
The good thing about this is that you're never left wondering,"What did I get for so-and-so? We did remember to get them something, right?" It makes it a lot easier to get a specific wishlist from that person.
In my case, I get to exchange gifts with my aunt. I love this, because she's one of my favorite people, and one of the few in the family that is knitworthy--who actually appreciates handmade gifts and treats them accordingly. Other family members that I have knit or crocheted for one might use or wear the items once out of obligation, then donate or put the item in a yard sale.
My aunt is super easy to shop for anyway, and there usually isn't much variation in her Christmas list. One item that always pops up is a specific style of sock that is difficult to find the rest of year, but pretty common around Thanksgiving and Christmas. Last year I got the idea of knitting socks for her. While that ended badly, I am trying again this year and the results seem to be a lot better so far.
Last year, my yarn didn't even get ordered until Dec. 6th. This year, it arrived in October--giving me plenty of time to get them done. At least, until Nano started. I work on these socks a little every day, mostly when I'm waiting in the car for someone, or on my breaks at work. I'm knitting them two at a time and 15 minutes is enough time for me to get a round and a half on each sock, or one round if it's a cable row.
Another strategy I've been using is the Year Round Christmas bin, where I make small items like washcloths and tuck them away for gifts--housewarming, birthdays, etc. I always have a few things on hand if a gift is needed.
Lastly, I advocate not trying to knit for everyone. Pick no more than three people, and don't pick large, involved projects. No sweaters, complicated lace, or afghans. Stick with simple, portable, easily accomplished goals like hats, scarves, socks, fingerless gloves, and useful household items.
So those are my tips for holiday knitting. What are yours?
One set could be writing, another cleaning, then one for my Christmas knitting and another to work on my next pattern, which I thought for sure would be done by now. I did not count on ripping it back every time I sit down to work on it.
In the mean time, however, I'll just have to come up with another solution. And for this, that means lists and a whole lot of prioritizing and planing
Last year in my family, we started doing this differently. Instead of everyone buying gifts for everyone, we drew names out of a hat and we each buy for that person. We did this because we're all pretty broke, for various reasons.
The good thing about this is that you're never left wondering,"What did I get for so-and-so? We did remember to get them something, right?" It makes it a lot easier to get a specific wishlist from that person.
In my case, I get to exchange gifts with my aunt. I love this, because she's one of my favorite people, and one of the few in the family that is knitworthy--who actually appreciates handmade gifts and treats them accordingly. Other family members that I have knit or crocheted for one might use or wear the items once out of obligation, then donate or put the item in a yard sale.
My aunt is super easy to shop for anyway, and there usually isn't much variation in her Christmas list. One item that always pops up is a specific style of sock that is difficult to find the rest of year, but pretty common around Thanksgiving and Christmas. Last year I got the idea of knitting socks for her. While that ended badly, I am trying again this year and the results seem to be a lot better so far.
Last year, my yarn didn't even get ordered until Dec. 6th. This year, it arrived in October--giving me plenty of time to get them done. At least, until Nano started. I work on these socks a little every day, mostly when I'm waiting in the car for someone, or on my breaks at work. I'm knitting them two at a time and 15 minutes is enough time for me to get a round and a half on each sock, or one round if it's a cable row.
Another strategy I've been using is the Year Round Christmas bin, where I make small items like washcloths and tuck them away for gifts--housewarming, birthdays, etc. I always have a few things on hand if a gift is needed.
Lastly, I advocate not trying to knit for everyone. Pick no more than three people, and don't pick large, involved projects. No sweaters, complicated lace, or afghans. Stick with simple, portable, easily accomplished goals like hats, scarves, socks, fingerless gloves, and useful household items.
So those are my tips for holiday knitting. What are yours?
Subscribe to:
Posts (Atom)
